Live Preview
Simulated water-level preview. This visual helps you understand what your sensor+Arduino will report; the blue gauge animates and flips to an alert state when level is high.
About the Project
This project uses an ultrasonic sensor to measure water levels, displays them on an LCD, and triggers a buzzer alert when flooding is detected. It's a practical safety tool designed with clarity and user-friendly alerts.
Complete Arduino Code
#include <Wire.h>
#include <LiquidCrystal_I2C.h>

LiquidCrystal_I2C lcd(0x27, 16, 2); // I2C LCD address and size

const int trigPin = 9;     // Trig → D9
const int echoPin = 10;    // Echo → D10
const int buzzerPin = 8;   // Buzzer → D8

const int maxDepth = 100;      // distance from sensor to bottom
const int floodThreshold = 10; // ALERT if distance <= 10 cm

int prevWaterLevel = -1; // start with invalid value to force first update

// Custom characters
byte upArrow[8] = {
  0b00100, 0b01110, 0b10101, 0b00100,
  0b00100, 0b00100, 0b00100, 0b00000
};

byte downArrow[8] = {
  0b00100, 0b00100, 0b00100, 0b00100,
  0b10101, 0b01110, 0b00100, 0b00000
};

byte equalSign[8] = {
  0b00000, 0b11111, 0b00000, 0b11111,
  0b00000, 0b00000, 0b00000, 0b00000
};

void setup() {
  pinMode(trigPin, OUTPUT);
  pinMode(echoPin, INPUT);
  pinMode(buzzerPin, OUTPUT);

  lcd.init();
  lcd.backlight();

  lcd.createChar(0, upArrow);
  lcd.createChar(1, downArrow);
  lcd.createChar(2, equalSign);

  lcd.setCursor(0,0);
  lcd.print("Flood Detector");
  delay(2000);
  lcd.clear();
}

long getDistance() {
  long sum = 0;
  for (int i = 0; i < 5; i++) {
    digitalWrite(trigPin, LOW);
    delayMicroseconds(2);
    digitalWrite(trigPin, HIGH);
    delayMicroseconds(10);
    digitalWrite(trigPin, LOW);

    long duration = pulseIn(echoPin, HIGH, 20000); // 20ms timeout
    long distance = duration * 0.034 / 2; // cm
    sum += distance;
    delay(10);
  }
  return sum / 5; // average
}

void loop() {
  long distance = getDistance();
  int waterLevel = maxDepth - distance;

  // Clear rows before writing new values
  lcd.setCursor(0,0);
  lcd.print("Water Level:   ");
  lcd.setCursor(0,1);
  lcd.print("                ");

  if (distance <= 30) {
    lcd.setCursor(0,0);
    lcd.print("Water Level:");

    lcd.setCursor(0,1);
    lcd.print(waterLevel);
    lcd.print(" cm ");

    if (distance <= floodThreshold) {
      lcd.print("ALERT ");
    }

    if (prevWaterLevel != -1) {
      if (waterLevel > prevWaterLevel) {
        lcd.write(byte(0)); // Up arrow
      } else if (waterLevel < prevWaterLevel) {
        lcd.write(byte(1)); // Down arrow
      } else {
        lcd.write(byte(2)); // Equal sign
      }
    }
  }

  // Buzzer logic: intermittent beep if flood
  if (distance <= floodThreshold) {
    tone(buzzerPin, 1000); // 1kHz tone
    delay(200);
    noTone(buzzerPin);
    delay(200);
  } else {
    noTone(buzzerPin);
    delay(1000);
  }

  prevWaterLevel = waterLevel;
}
Code Explanation
Key Parameters
- maxDepth = 100 cm: Maximum water depth your sensor can detect (adjust based on your tank size).
- floodThreshold = 10 cm: Water level at which the alert triggers. When detected distance ≤ 10 cm, buzzer sounds.
- I2C Address 0x27: Standard address for 16x2 LCD modules. If your LCD doesn't respond, use an I2C scanner to find the correct address.
How It Works
1. Sensor Reading (getDistance)
Sends an ultrasonic pulse and measures the time it takes to bounce back. Averages 5 readings for stability.
2. Water Level Calculation
waterLevel = maxDepth - distance
If the sensor is 10 cm above water, distance = 90 cm → waterLevel = 10 cm.
3. LCD Display
Shows water level in cm with directional arrows (↑ rising, ↓ falling, = stable) and ALERT text when flooding detected.
4. Buzzer Alert
Intermittent beep (200ms on/off) when distance ≤ 10 cm. Helps you respond quickly to flooding.
Custom Characters
The LCD displays three custom 5×8 pixel characters:
- upArrow (0): Shows water is rising
- downArrow (1): Shows water is falling
- equalSign (2): Shows water level is stable
Tuning Tips
- If buzzer triggers too early/late, adjust
floodThreshold - For more stable readings, increase the loop count in
getDistance()from 5 to 10 - If LCD doesn't initialize, try 0x3F as the I2C address instead of 0x27
- Sensor placement: Mount ultrasonic sensor pointing downward into the water container
Setup Guide
- Wire.h — built into Arduino IDE.
- LiquidCrystal_I2C.h — install via Library Manager or manually.
Download Links
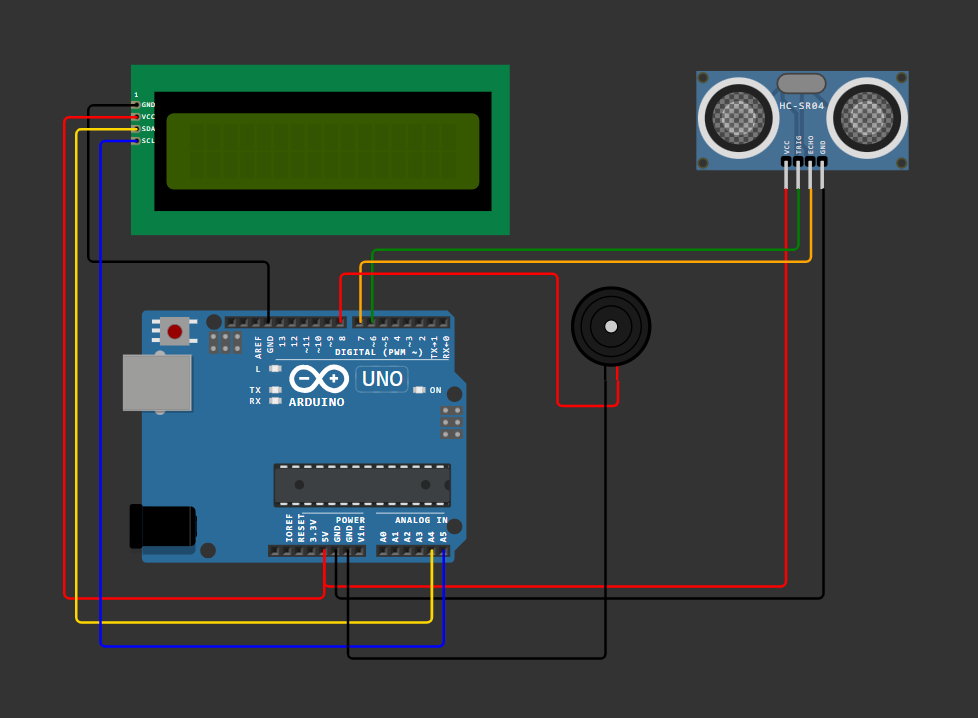
Connections
- Ultrasonic Sensor: VCC → 5V, GND → GND, TRIG → D9, ECHO → D10
- LCD (I2C): VCC → 5V, GND → GND, SDA → A4, SCL → A5
- Buzzer: + → D8, – → GND
Gallery
Here is the actual flood detector circuit setup:
🏆 Prateek Priyadarshi Certificate

Achievement: Recipient of Gold Medal at the STEM Project Exhibition for outstanding innovation and engineering excellence.
Project: Flood Detector System - An intelligent water level detection and alert system using Arduino and ultrasonic sensors.
Recognition: This certificate recognizes exceptional performance in Science, Technology, Engineering, and Mathematics (STEM) and the development of practical solutions that address real-world problems.
✨ Congratulations on this Outstanding Achievement! We are proud to celebrate this remarkable success, recognized and honored by the teachers of our class. Your dedication, hard work, and perseverance have truly set an inspiring example for everyone. This achievement is not just a milestone, but a shining reminder of what passion and commitment can accomplish.
Downloads
You can download the project files below. If the downloads/ copy is missing the page will fall back to the images/ copy.
Features
📊 LCD Display
Shows water level with rising/falling/stable indicators.
🔔 Buzzer Alert
Triggers when water level crosses flood threshold.
⚡ Smart Logic
Custom characters make alerts intuitive and clear.